There’s something about spring that makes me want to refresh everything—my home, my wardrobe, and even my reading routine! And what better way to bring a little springtime beauty into everyday life than with a DIY pressed flower bookmark?

I came across this idea recently and had to try it. These bookmarks are so simple to make, yet they look like something straight out of a boutique. Whether you’re a book lover yourself or looking for a thoughtful handmade gift, these acrylic bookmarks are the perfect craft to welcome the season.
In this post, I’ll walk you through how to make pressed flower bookmarks, where to find the supplies, and tips to get that seamless, professional look. Plus, they make the cutest gifts for book-loving friends!
Grab all the affordable Pressed Flower Bookmark supplies here!
Table of Contents
Why Pressed Flower Bookmarks?
Pressed flowers have been a timeless way to preserve nature’s beauty, and they make for stunning, delicate designs. Unlike paper bookmarks, acrylic bookmarks are durable, giving your floral design a beautiful, long-lasting effect.
And let’s be honest—there’s something about pressed flowers that feels so nostalgic and relaxing. It’s the perfect weekend project to slow down, enjoy some creativity, and bring a touch of nature into your everyday reading.
If you don’t want to press your own flowers, there are so many gorgeous options online, check out these affordable ones on Amazon.

Supplies You’ll Need
Before we jump into the step-by-step process, here’s everything you need to make your own pressed flower bookmarks:
Essential Materials:
✅ Clear acrylic bookmarks (I got mine on Amazon!)
✅ Dried pressed flowers (choose colors you love!)
✅ Mod Podge (yes, I still call it Modge Podge sometimes)
✅ A small paintbrush
✅ Tweezers (optional but helpful for placing tiny flowers)
✅ Pretty ribbon (mine came with the bookmark pack!)
You can find pressed flowers online, in craft stores, or even make your own by pressing flowers in a heavy book for a few weeks.
Step-by-Step Guide to Making Pressed Flower Bookmarks


Step 1: Peel the Protective Film
This might be the most important step—don’t skip it! Your acrylic bookmarks will come with a clear film on both sides. Make sure to peel it off before you start, or your final result won’t last.
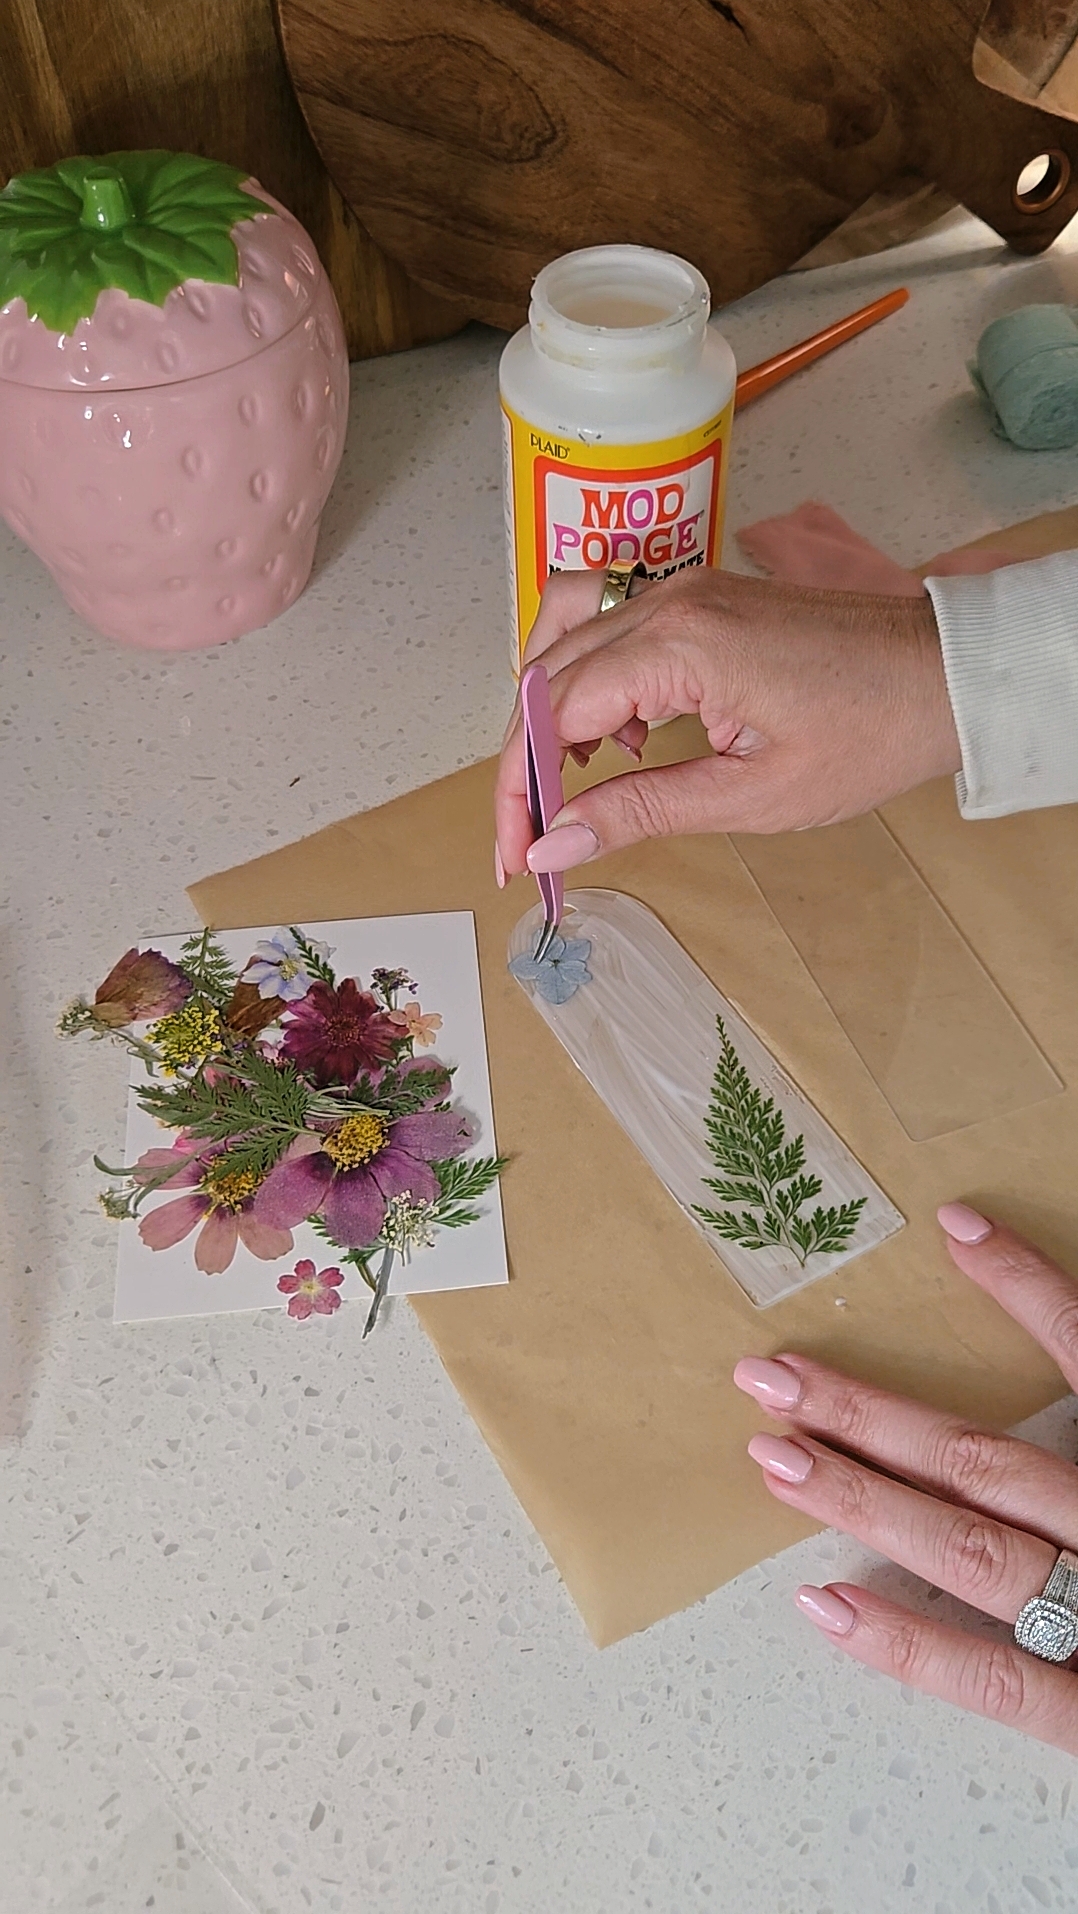
Step 2: Arrange Your Pressed Flowers
Now for the fun part! Play around with different floral arrangements before committing to a design. I love mixing colors and textures to create a delicate, spring-inspired look. Then when you’re ready, using a paint brush, apply a thin layer of Mod Podge to the bookmark, and add the flowers on top in the design you want.
💡 Pro Tip: Use tweezers to carefully place smaller flowers and greenery for more precision.
Step 3: Seal with Mod Podge
Once you’re happy with your design, it’s time to seal it in place! Using your same small paintbrush, gently apply a thin layer of Mod Podge over the flowers. This will help them adhere to the acrylic and create a smooth, protective layer.
Make sure to apply an even coat so there aren’t any bubbles or clumps.
Let It Dry & Add the Finishing Touches
Step 4: Let Your Bookmark Dry Completely
Patience is key! Let your bookmarks dry fully before handling them. This will ensure that your flowers stay in place and your design remains crisp and clear.
Step 5: Add a Ribbon for the Perfect Finish
To complete your floral bookmark, tie a pretty ribbon through the pre-punched hole. The bookmark set I ordered came with gorgeous pastel ribbons, and they add such a charming, elegant touch.

Creative Variations to Try
Want to customize your pressed flower bookmarks even more? Here are a few fun ideas:
🌿 Personalized Bookmarks: Add initials or small decals for a personal touch.
🎨 Gold Foil Accents: Try adding a thin layer of gold leaf for a luxe effect.
🌼 Themed Bookmarks: Use flowers and colors that match your favorite books!
✨ Glitter or Resin Layer: Seal your bookmarks with a layer of resin or sprinkle some fine glitter for an extra sparkle.
Perfect for Gifts & Spring Reading
These handmade bookmarks make such thoughtful gifts for:
📚 Book lovers – Pair it with a favorite novel!
🎁 Mother’s Day gifts – A sweet and sentimental present.
💌 Teacher appreciation gifts – A unique and creative way to say thank you.
🎨 Craft nights with friends – A fun group activity!
Whether you’re making them for yourself or gifting them to a fellow book lover, these bookmarks are a beautiful way to bring a little springtime joy to every page.
Final Thoughts
I’m obsessed with how these turned out, and I love that they were so easy to make! If you’re looking for a quick, creative project to welcome spring, this is it. Plus, who doesn’t love a handmade gift?
Let me know if you try this Pressed Flower Bookmark DIY—I’d love to see your creations!
Happy crafting, and happy reading! 🌸📖✨
More At Home DIY and Crafts!


Custom Potted Hanging Herb Garden DIY
A beautiful vertical garden, especially perfect for hanging herbs, but you could add any plant. Make with scraps for a budget-friendly, cost-effective potted hanging herb garden DIY!


Leave a Reply